Monday, October 17, 2011

Home-A-Rama- 2011

Well, I must be getting old, because I skipped the wine fest and ODU homecoming game to attend Homearama! To me a day filled with touring homes, scoping out designers, and admiring landscaping tops football and even wine! Homearama 2011 was in the Riverfront section of North Suffolk.  There were nine model home to tour.  Although each home was very beautiful, numbers 6 and 9 were my favs!


Let's start with # 9 - The King's Cottage


This adorable "little" house had a lot of features that I adored! First, I love the cottage feel of it.  It wasn't nearly as large as the other homes, yet the placement of the rooms and the open floor plan gave it the same grandness on a smaller scale. 


The front porch was beautiful! Check out the wood ceiling and double fans.  I think I would spend more time on that porch than inside the house.


This kitchen was my favorite out of all the houses! The two tone wood work and high end appliances were a nice touch.  I love the soft green and antique white finish.  Very cottagey! 


You can see the openness in this photo.  The kitchen, eat-in dining, and living room all flow together.  Great for entertaining. Check out those wide plank pine floor too! Perfection! 


And then there was house # 6- Tranquil Living....holy moly! 


This house was AMAZING.  The huge wrap around front porch and the architectural details throughout the  home were incredible.  Here are just a few highlights:


MW and the hubby gave this house two thumbs up!


 Ahhh! Look at that porch! I can just picture myself sipping sweet tea in that rocking chair.  A girl can dream can't she?


Speaking of dreams...check out this pantry.  I am so weird, but this may have been my favorite detail in the entire house...well, next to the porch and the soaking tub.  The organizational freak in me can just picture having my food organized in labeled baskets behind these French doors.


This downstairs bathroom was decorated so cool! Check out the newsprint shower curtain (hung high just like I did with mine upstairs!) and a burlap window shade! 


Pool and adorable pool house...and yes, that's my mom with her eyes closed also imagining herself in this home!


Here is a shot of one of the architectural details I was telling you about - built in shelves in the eat-in kitchen and wainscoting trim! LOVE! Also, see those ceramic sheep?  They almost went missing! I really wanted them!  Can you just picture me running out the door with a sheep under each arm?! haha! 


Ahhh, pretty kitchen with antique white cabinetry.


This is a little mud room attached to the garage.  Isn't that a great idea?  The kids can put their book bags, dirty shoes, and coats here before coming into the rest of the house. 


 Oh yes! There is my soaking tub.  "Calgon, take me away!"


I highlighted just two of the nine gorgeous homes! If you have time I recommend checking them out for yourself.  You will gather tons of inspiration. Homearama will be going on for two weeks - October 15-30th.  

Thursday, October 13, 2011

Afternoon Plate Project

It is a well know fact I have a little smidge of ADD...okay, maybe a lot.  I was getting a little burned out on my bathroom revamp, so I switched projects.  I'll get back to the ol' bathroom, but decided to switch it up and decorate for Halloween (my second favorite "holiday"...not sure if Halloween is really a holiday, but you know what I mean) and work on my plate project.


I am going to be honest, I wasn't sure if I liked the idea of hanging plates on the wall.  I saw a few inspirational photos on Pinterest and it got me thinking.


plates on wall


Pinned Image


Simple wall rack for plates.  

plates!

Then I saw these BEAUTIFUL, rustic plates at Tuesday Morning (the first two), and that got me thinking a little more.


The final straw...I consulted friends, and they all agreed that it was cool...not stuffy and old ladyish.  So I went back to Tuesdays and picked up a few of those plates.  I also dusted off an Ironstone turkey platted that I already had hiding in a drawer (I am going to put this beauty on another wall). 


Finally, a sweet friend (with great taste) found a couple more coordinating cuties for me at TJs and voila! A plate montage!


In the event I have inspired you (YAY!) and you are thinking about adding a few plates to a wall in your house, let me share the very easy process!  First, lay the plates out on a flat surface and decide how you want to arrange them on your wall.  I kept it pretty simple!


Next, add the easy plate mounting hardware.  I picked these up at Micheals for $2.65 apiece.  They come is sizes small, medium, and large.  I used the small for the salad plates, medium for dinner, and large for the platter.


Then, eyeball where you want the largest plate to rest on the wall...I think a little above eye-level is perfect.  The smaller plates will fill in the spaces above and below the "focal plate".


Finally, measure, mark with a pencil and add the nail.  Your plates are then ready for hanging!

Monday, October 3, 2011

Bathroom Revamp - Part 4

Did you think I forgot about my bathroom projects?  Not a chance!  It's just that...well...project 3 took a bit more time than expected.  I even had to bring in the big gun...my dad! LOL!   I am SO happy to cross #3 off the list! 

1. Remove the old shower curtain rod and hang much higher.  This will give the illusion of higher ceilings. Also, replace the standard size shower curtain with an extra-long, 96" white one. 
2.  Add a window treatment to the empty window. 
3.  Remove the unframed mirror above the sink and replace with a framed mirror, then hang the mirror higher.  Replace molding strip where the mirror used to "sit".
4.  I love the wainscoting and the glass knobs (instant cottage character), but I need to add a new rug and accessories to make the space look finished. 
5.  Organize the drawers and cabinets so that I can easily access toiletries, make-up, medicines, etc.


Mirror and trim BEFORE


Before I started this project I took a little trip to Lowes and purchased all the materials I would need: 

Molding - 2 types - one for the frame and one for the trim  ($25 total)
Flat Mounting Kit  ($2.65)
Liquid Nails ($4.50)
Spackling (already had)
Fine grit sandpaper (already had)

Okay, so I started by removing the existing mirror.  This is the little "surprise"  I found beneath.  Huh?  Removed all that strangeness.  Oh, and let me apologize in advance for the horrible photos!  It was raining the entire weekend and I had ZERO light source (other than that REALLY bright overhead light)! 


I then had my dad help me lift the mirror up and rehang higher and using the flat mounting clips.  I chose these so that when we added the molding it would lay over the hardware. 


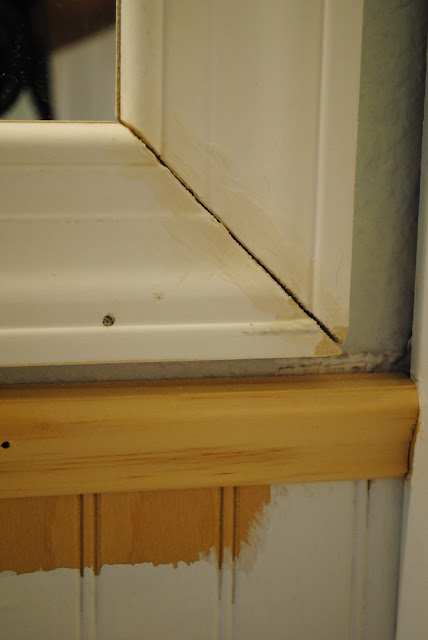
You can see where the molding is missing so instead of just patching the one area we dad replaced all of it. Okay, little bit of a blooper here.  I should have painted all of the trim BEFORE dad put it up.  It just added more work...and the dreaded painters tape later.  Ugghhh! 


Now, the next part was where things got a little complicated! I purchased a simple 2 1/2 inch molding for the frame.  Measured the length for each side, then had my dad cut each end at 45 degree angles.   That was the hardest part - getting the molding measured and cut.  We measured and remeasured several times to make sure our math was correct.  Math is not my strong suit! Thank goodness for dear 'ol daddy-o! 


After we had the materials I just added a little Liquid Nails to the back of each section of molding and glued them to the edge of the mirror.  Dad also added a few little nails for extra support.   I let everything dry overnight.


Where the corners meet there was a small gap of space, so I spackled the space and let dry.  I then sanded everything down until it was nice and smooth.


The final step was to paint everything white using a semi-gloss, latex trim paint.  Again, I should have painted everything in advance, but oh well, I'm a DIY amateur.


Mirror and trim AFTER
 A week couple of weeks later I was completely done!  Since I only have small windows of time, this project took WAY longer than necessary!  For most I think everything could have been completed in a weekend.  A lot of work, BUT, HUGE savings!  The entire project, all in, cost less than $35. Whoohoo!